Wednesday, July 27, 2011

Broccoli and tofu filled cannelloni


I used to have a bit of a love/hate relationship with cannelloni. Eating it was always a joyful experience but stuffing the pasta tubes with messy filling tested my patience and made me a little grumpy on occasion. My last few experiences with making cannelloni have been more enjoyable and rewarding using home-made pasta and it tastes so much better. Those old ready-made tubes have become a convenience of my past I'm not sure I will ever go back to now. 

Although cannelloni has appeared on my blog once before I wanted to revisit a few things as I am the type of person who rarely makes something the same way twice. I purchased semolina flour recently (mainly for the purpose of making pita bread) and went hunting around for a semolina based pasta recipe. The recipe I ended up trying cannot be judged properly at this stage as I made an error when adding the olive oil and used a tablespoon rather than a teaspoon. This could have been the cause of the dough being a little harder to work with than my usual pasta dough so I will have to give it another try with the correct measurements.


Instead of making a standard spinach and tofu filling, I opted to try broccoli and tofu and simply whizzed up all of the filling ingredients in my food processor. This cannelloni was sensational and although the dough was harder to work with, the resulting pasta was so soft and delicious it made the effort totally worthwhile. 


Broccoli and tofu filled cannelloni

Pasta dough (adapted from A (Life) Time of Cooking)
3/4 cup plain flour
3/4 cup semolina flour 
1/3 cup water
1 1/2 teaspoons olive oil (I accidently used a tablespoon rather than a teaspoon)

Place the flours into a bowl, mix together thoroughly and make a well in the centre. Pour the water and olive oil into the well and work the flour into the water slowly until a slightly wet dough has formed. Place the dough into a lightly oiled bowl, cover with plastic wrap and rest for 30 minutes.

Broccoli and tofu filling

1 head broccoli, cut into florets 
350g firm tofu
1/4 cup nutritional yeast
1 clove garlic, crushed
1/2 teaspoon salt
pepper, to taste

Place all of the ingredients in a food processor bowl and pulse for about a minute. The resulting mixture should be soft and crumbly and the broccoli finely chopped.

Tomato sauce

1 tablespoon olive oil
1 medium onion, finely diced
2 garlic cloves, crushed
700ml jar tomato passata
1 teaspoon dried basil
salt and pepper, to taste 

Heat olive oil in a medium saucepan, add the onion and cook over a medium for a few minutes until the onion has softened. Stir through the garlic for a minute then add the tomato passata and basil. Bring to the boil, then reduce the heat and simmer for 10 minutes or longer. Add salt to taste. 

Cannelloni assembly

Use a pasta machine or rolling pin to roll out thin sheets of pasta. Cut out rectangular shapes of pasta measuring the width of your baking tray. Place a line of the filling down the centre of the pasta, then roll up to enclose the filling. Repeat until the pasta or filling runs out.

Spread about 1/4 of the tomato sauce over the bottom of your baking dish. Place the cannelloni tubes in the tray then cover with the remaining sauce. Cover with foil and bake in the oven at 180C for 30-40 minutes or until bubbling.

Monday, July 25, 2011

Enlightened Cuisine

The Crown complex is somewhere I usually try to avoid like the plague and have only had the displeasure of attending on a few rare occasions. When the man mentioned taking our son to see the last Harry Potter movie there, I agreed straight away as this would be my chance to introduce us to a nearby restaurant I had been wanting to go to for so long - Enlightened Cuisine.

Enlightened Cuisine is a popular and well renowned Chinese vegetarian restaurant that specialises in mock meat meals as well as a variety of tofu and vegetable based dishes. The man and I were very impressed when we sampled a selection of their dishes at World Vegan Day last year and ever since I had wanted the chance to choose from their full range of meals.

Rendang love extends throughout the three of us as our son made us proud and settled upon this as his choice almost straight away. The man and I were in debate mode for quite some time. My initial thought had been to order a tofu or vegetable dish so we weren't just eating mock meat. The man thought that if we were taking the rare opportunity to go to a mock meat restaurant we shouldn't be choosing tofu or vegies as we already eat them on a regular basis. We eventually put ourselves on the spot, ordered without final consultation and ended up with two Kung Po's between us; chicken and lamb. 

Apologies for the poor quality phone pics throughout this post...

The Beef Rendang was served with potatoes, the sauce was nicely spiced and the mock meat full of flavour. Our son is not vegan nor vegetarian but declared this to taste better than meat. From memory the rendang at Loving Hut had a slightly superior sauce (although I can't put my finger on why or how it was different) but their mock meat slices were not as nice as the chunks that Enlightened Cuisine use.


The Kung Po lamb was also delicious with a wonderful spicy sauce that was full of whole chillies and thankfully, a good selection of vegetables. The Kung Po chicken was a bit different to the lamb as it was served in a nest of fried potatoes and topped with cashews. It also contained a large amount of whole chillies and the same selection of vegies but the sauce was much sweeter and lighter in colour than the Kung Po lamb sauce. Of these two dishes, we all preferred the lamb over the chicken.


The service on the night was prompt and attentive and the meal was deemed to be a success in all of our eyes. Now that we have finally made it to Enlightened Cuisine, I'm sure we will visit again to sample more of the extensive menu as my boys do love their mock meat!

Enlightened Cuisine has been reviewed in the past by many bloggers but more recently by Where's the Beef,  Vegetarian Life Australia, vegan about town and easy as vegan pie.

Enlightened Cuisine
113 Queensbridge Road, Southbank
Phone: 9686 9188
Web: www.ecuisine.com.au

Wednesday, July 20, 2011

Experiments with ground "meat"


Whilst preparing my VOTM post about cauliflower last month I stumbled across some interesting recipes in my bookmarks and there was one in particular I couldn't wait any longer to try. Ricki of Diet, Dessert & Dogs posted a recipe for ground "meat" about a year ago using cauliflower and walnuts as the main ingredients. It sounded like a healthier alternative to TVP which is something I don't like to use on a regular basis. 

The ground "meat" is very simple to prepare. After processing the nuts and cauliflower, seasonings are stirred through the mixture, then it is baked in oven. There were some interested people peering in the oven to see what on earth I was up to although no-one was overly surprised by my statement that it was ground "meat". The man and son are fully aware that I love to try new things and how creative some veg recipes can be. 


I decided to put half of the ground "meat" to the test the following day in a good old spaghetti bolognese. The one thing I did notice was that the "meat" devoured the tin of tomatoes, the sauce had a brown colour rather than red and didn't taste tomatoey enough so I added half a jar of tomato passata as well. 

When we sat down to eat, the boys declared it as my best veg spag bol effort to date and I have to agree with them.  The ground "meat" is quite hearty and filling which is probably due to the amount of walnuts that are included. This bolognese sauce reminded me of the flavours that were present in the lasagne I made with nut roast leftovers not so long ago.      


A couple of nights later, I used the remaining ground "meat" in another favourite meal of ours - chilli con "carne". Once again I used more tomatoes than usual as I felt it was required. This was served simply on some brown rice and topped with the cashew crema recipe from Viva Vegan. After the success with the bolognese sauce, I wasn't surprised to find that the chilli con "carne" was delicious too.  

There was still some remnants of chilli con "carne" so I decided to give the ground "meat" batch one last meal. Baked potatoes are something that I don't cook often and it seemed like the perfect way to finish off the chilli con "carne".   


I am thoroughly impressed with Ricki's inventive recipe and will definitely be making more batches of this in the future. 

Chili con "carne"

1 tablespoon olive oil
1 onion, diced
2 cloves garlic
1 teaspoon oregano
1 teaspoon smoked paprika
1 heaped teaspoon cumin
1 scant teaspoon chilli powder
1/2 teaspoon salt
1 x 400g tin chopped tomatoes
350ml tomato passata
1 carrot, diced
1/2 quantity ground "meat"
1 x 400g tin kidney beans, drained and rinsed well
salt and pepper, to taste

Heat a tablespoon of olive oil in a large saucepan and fry the onion until soft. Add the garlic and stir for a minute then add the oregano, smoked paprika, cumin, chilli powder and salt. Add the tinned tomatoes, passata, carrot, ground "meat" and kidney beans. Simmer until the carrots are tender, then season with salt and pepper. Serve on a bed of rice and top with cashew cream or guacamole. 

Spaghetti bolognese with ground "meat"

1 tablespoon olive oil
1 onion, diced
2 cloves garlic
1 carrot, diced
1 x 400g tin crushed tomatoes
350ml tomato passata
1 teaspoon dried basil
1 teaspoon dried oregano
1/2 quantity ground "meat"
salt and pepper, to taste

Heat a tablespoon of olive oil in a large saucepan and fry the onion until soft. Add the garlic and stir for a minute then add the carrots, tinned tomatoes, passata, basil, oregano and ground "meat". Simmer until the carrots are tender. 

Season with salt and pepper. Serve on cooked spaghetti or other pasta of your choice, topped with cheezly or vegan parmesan.

Monday, July 18, 2011

Ethiopian inspired soup


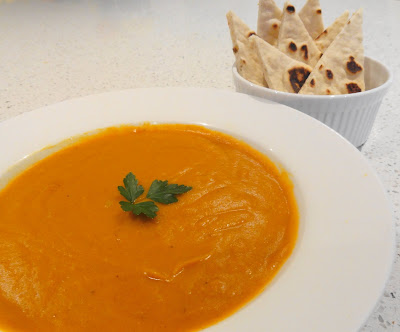
The other night I felt like making soup which is not unusual as I am a huge lover of soup and normally make a least one pot a week over the colder months. The problem on this occasion was that my weekly shopping was due the next day which meant there wasn't a lot of choice in my fresh produce department. I wasn't willing to venture out into the cold night so I tossed around a few ideas and decided to invent an Ethiopian flavoured soup.

It was a great idea and I was strutting around the kitchen absolutely convinced that I would be able to transform 3/4 of a cauliflower, some carrots, pumpkin and red lentils into a creamy, delicious and spicy Ethiopian flavoured soup. I had made a fresh batch of the berbere spice mix recently (see below photo) but had run out of the spiced clarified butter, niter kibbeh which needs to be prepared a day in advance. Never mind, I had a plan.


The process of the soup was started in the common way that has been standard throughout the Ethiopian stews I have made. The onions are usually dry-fried until soft, then the nitter kibbeh is added along with garlic, ginger, berbere and any other spices. After my shallots were soft, I decided to fry some of the whole spices that are normally infused in niter kibbeh until they became fragrant and then add dairy-free margarine with the garlic, ginger and berbere. 

The smells emanating through the kitchen were mouth-watering and made me want to sit down and have a bowl even though I had eaten dinner not too long ago. The following morning I looked up the Karen Martini pita bread recipe which I posted a while back and made a batch to have with the soup. Last time I didn't have any semolina and used polenta which worked but this time I used semolina and the pita bread was so much lighter. It's such an easy recipe to make and was the perfect partner for mopping up this delicious soup. The man, son and I all loved our lunch and I will definitely be making this soup again.  


Since my posting series about Ethiopian food, I have gone back and tried some other Ethiopian recipes. A split pea stew from VeganDad's blog was lovely and I trialled an injera bread recipe using red sorghum flour (as I haven't been able to locate the authentic ingredient, tef flour). I had planned to post about the injera and even got half-way through writing it up before other things took higher priority and time moved on...

This soup is being submitted to the No Croutons Required event which is being hosted by Lisa this month and the theme is chillies.

Ethiopian inspired soup

4 shallots, diced
1 cinnamon stick
2 cloves
4 cardamon pods
1/4 cup dairy-free margarine
4 cloves garlic, minced
2 heaped teaspoons minced ginger
1 tablespoon berbere
1 cup red lentils
6-8 cups water
1 teaspoon salt
400ml tomato passata or you could use a 400g tin of tomatoes
2 medium carrots, diced
400g pumpkin, diced
3/4 head cauliflower, chopped into florets
salt and pepper, to taste

Dry-fry the shallots in a large pot over low-medium heat until soft and starting to brown. Add the cinnamon stick, cloves and cardamon pods and cook, stirring for a minute. Melt in the dairy-free margarine and then add the garlic, ginger and berbere. When the garlic and ginger begins to brown, stir through the red lentils so they are coated with the spices then add 6 cups of water and a teaspoon of salt. 

Bring to the boil, adding the carrots, pumpkin and cauliflower (or other vegetables of your choice) as you chop them, then reduce the heat and simmer for about 30 minutes. Remove the cinnamon stick, cloves and cardamon pods, then process the soup in batches in a blender and return to the pot. Add more water if a thinner soup is desired. Season with salt and pepper and garnish with fresh chopped parsley. 

Saturday, July 16, 2011

Broccoli burgers on the blogger-go-round


One of the things I love about Cindy and Michael's blog is their links section on the right hand side titled "Old favourites we're eating this week". Quite often, I meander off to have a look at their old recipes and was particularly interested when I saw one called broccoli burgers some time ago. This recipe was linked back to Johanna's blog where she had discovered it in an article highlighting best vegetarian burger recipes. 

It wasn't a vegan recipe but sounded like it could be made vegan pretty easily so I had a stab with a few adaptations that night and was very impressed. These burgers were really tasty! The recipe came with the bonus of being an oven-baked version which I prefer over pan-frying in batches. It gives you more time to get other components of your meal ready, less angst about breaking up burgers and you don't use as much oil so they are better for you. Win, win, win!


The first time I baked the broccoli burgers no photos were taken or notes written down on the vegan adjustments that I made. When I had a second attempt last week they turned out just as I had remembered them to be and this time I was better prepared with camera and computer. 

The initial mention of broccoli burgers did instigate a few strange looks although they have since been enjoyed by all of us. Broccoli burgers seem to go well with a variety of condiments; gravy, tomato sauce, tomato chutney and BBQ sauce have all paired nicely and I even enjoyed a couple of cold plain left-over burgers for a quick snack.   

Broccoli burgers (Adapted from Where's the Beef via Green Gourmet Giraffe and originally posted here)

1 medium-sized head broccoli
2/3 cup almonds  
2 slices of wholemeal bread
1 red onion, cut into quarters
1/4 cup nutritional yeast flakes
1 tablespoon vegan worchestershire sauce
2 tablespoons ground flaxseed
1/3-1/2 cup water
salt and pepper, to taste

Preheat oven to 200C. Chop the broccoli into large florets, place in a food processor bowl and pulse until finely chopped. Remove the broccoli and place in a large bowl. Place the almonds in the food processor and process until finely chopped. Remove and add to the bowl with the broccoli. Repeat these steps with the slices of bread and then the onion.

Add the nutritional yeast flakes to the bowl and mix thoroughly so that all ingredients are well combined. Stir the ground flaxseed together with 1/4 cup of water and reserve 1/4 cup of water for later. Drizzle the worchestershire sauce over the top of the ingredients in the bowl, then add the flaxseed/water mixture and stir thoroughly until well combined. Add the reserved water slowly, stirring through and testing every so often to determine when the mixture becomes soft enough for rolling into burgers. You don't it to get too moist so all the water may not be required.

Line a large roasting tray with baking paper and spray lightly with olive oil. Roll the mixture into balls and then flatten out into burgers. Give the tops of the burgers with a spray with olive oil and bake in the oven for about 20 minutes or until the bottoms are browned. Flip the burgers over and bake for a further 20 minutes.  

Wednesday, July 13, 2011

Cinnamon fruit bread and frankie casserole


Last weekend was rather busy in the kitchen with a few new recipes on trial. Time has been short since so I will only write about a couple of them and leave the rest for another post.

After cooking dinner on Friday, I found myself flicking through my copy of Vegan Yum Yum. The cinnamon swirl raisin bread had been bookmarked a long time ago although I had never made the effort to try it. Weekend breakfasts haven't been very special of late and they are always savoury so it was time to branch out and try something new.


The step by step instructions in Vegan Yum Yum paired with accompanying instructions were extremely thorough and easy to follow. It's exactly what is required for a recipe of this length. You don't want to mess anything up as the whole process takes about 4 hours from start to end.    

I was fully aware that my pantry did not contain raisins before I started to make the bread although I had planned to use mixed fruit left over from hot cross bun baking instead. When the mixed fruit came up a little short, I made a quick decision to add a few dried cranberries as well.


The construction of this loaf was a lot of fun and although the whole process was lengthy there was plenty of idle time as well. The loaf turned out surprisingly well for a first attempt. My only criticism was that the cinnamon swirl wasn't as prominent at the ends as it was in the middle which was probably due to inconsistencies in rolling out the dough. My son was the biggest fan of us all and requested that I make this often. The man and I found it a tiny bit too sweet (which is probably why my son loved it so much) although this didn't stop me from toasting slices for breakfast for 4 days in a row.      


Frankie casserole was a specialty that my mum used to make frequently throughout my youth. It was a meal that my grandmother also made for mum in her childhood and I recall that one of my aunts also used to make it for my cousins. I'm not sure if it ever came from a written down recipe or whether it was just something that was passed on through experiences in the kitchen. I know it was passed onto me via the latter method.

Traditionally it was made with sausages and some type of casserole beef and the vegies added were always carrots and peas. The sausages were always the highlight of the meal for me and leftovers were particularly nice in a toasted sandwich with cheese. I attempted to make a veg version of this once before using vegie sausages bought from the supermarket and none of us enjoyed it but I had a feeling it was due to the store bought sausages which we have never been fans of.

When I started blogging, chorizo sausages from Viva Vegan were on high rotation and they were being used in a variety of different ways. It was the first gluten based sausage recipe I had trialled and we all loved them. Chorizo sausages aren't really suitable for a non-spicy casserole, so I found a recipe on VeganDad's blog that seemed more appropriate.      


My adaptation of this recipe is posted below although some further tweaking will occur in the future as the seasonings were quite subtle. The sausages were perfect for this casserole although after sneaking a bit before they went into the pot, I'm not sure they had enough flavour to enjoy in piece of bread of bread with tomato sauce. I was pleased to be able to successfully revamp this old meaty childhood dish into tasty vegan fare and will definitely make this again one day.  

Vegan sausages (Adapted from VeganDad's recipe)

1/2 cup cooked cannelini beans
1 cup water
1 tablespoon olive oil
2 tablespoons soy sauce
1 1/4 cup gluten flour
1/4 cup nutritional yeast
1 teaspoon onion powder
1 teaspoon garlic powder
1 teaspoon Massel "beef" stock
2 teaspoons smoked paprika
1 teaspoon dried oregano

Mash the cannelini beans in a small bowl until there are no whole beans remaining. Mix the water, olive oil and soy sauce together in a jug. 

In a large bowl, combine the gluten flour, nutritional yeast, onion powder, garlic powder, "beef" stock, smoked paprika and dried oregano. Make well in the centre, then add the cannelini beans followed by the wet ingredients. Mix until thoroughly combined.

Divide the dough mixture into 6 even pieces. Roll each piece of dough into a sausage shape with your hands. Place the sausage in a piece of aluminium foil, roll up securely but not too tightly and close each end. 

Steam the sausages for 40 minutes in a steamer. Allow to cool completely and then store in the refrigerator. 


Frankie casserole

2 tablespoons olive oil
1 x quantity sausage recipe above
1 onion, diced
2 cloves garlic, crushed
3 small carrots, chopped
8 button mushrooms, sliced
1/4 cup vegan worchestershire sauce
1/4 cup soy sauce
2 tablespoons tomato sauce
2 tablespoon BBQ sauce
2 tablespoons white vinegar
2 cups water
1 tablespoon cornflour
1/4 cup water
1 cup green peas

Heat half of the olive oil in a frying pan, add the sausages and fry over medium heat until golden on all sides. Remove from the heat and allow to cool. Chop each sausage into 4 or 5 pieces.

Heat the remaining oil in a large pot, add the the onion and cook for about 5 minutes until soft and golden. Stir through the garlic for a minute then add the carrots, mushrooms, sausages, worchestershire, soy, tomato and BBQ sauces and the water. Bring to the boil and cook rapidly for 10-15 minutes.

Place the cornflour into a small bowl, add 1/4 cup water and stir until it becomes a smooth paste. Reduce the heat of the casserole to low, add the cornflour paste whilst stirring continuously. Mix through the peas and simmer for 5 minutes. Serve with mashed potatoes.

Thursday, July 7, 2011

Spiced roasted chickpeas


When it comes to leaving comments on other people's blogs, I have to admit that I am inconsistent. There are periods when I have more to say than others and after leaving a comment I don't have a hard and fast rule about returning to read follow-up comments. 

The other night when I should have been finalising a post and wasn't totally motivated, I became sidetracked. I recalled a few posts where I had left comments recently and went back to have a further look. When I revisited Johanna's Smoky Lime Chickpeas post, there were several references to a remark I had made about eating the chickpeas on the day they are made as they loose their crunchiness on day 2. Other commenters including Johanna were interested in how I achieved the crunchy chickpea in the first place.

My mind was in a spin! It was well over a year, maybe even two since I had made them and I didn't keep the recipe or take any notes. I had a feeling that the recipe didn't work as stated so a longer cooking time and/or higher oven temperature was required to make these little suckers crunchy. After a bit of googling and comparing a few recipes, a highly rated comment against this recipe caught my eye as it introduced a different technique, dry-roasting.

The comment made perfect sense. Adding a marinade prior to cooking means that the chickpeas soak up this moisture and take even longer to dehydrate and become crunchy. Nonetheless, I did feel a bit skeptical about how well the seasoning would adhere to the chickpeas at the end of the process. I settled upon giving this method a try, however the person that left this comment didn't mention anything about the oven temperature. 

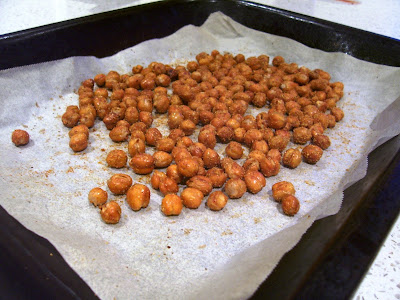
My gut told me to try cooking them at around 200C as I didn't want to risk burning the chickpeas by baking them at a higher temperature. About 35 minutes into the cooking time, I took a peek and removed a couple of chickpeas to sample. They weren't quite crunchy enough by this stage but were getting close.  Five minutes later, I noticed that the larger chickpeas were still a wee bit soft and the smaller ones were nice and crunchy. After a total of 45 minutes cooking time they seemed to be pretty consistent.


All they needed now was a light spray with olive oil and a toss with a spice mix I made up on the fly. Whilst munching away on these tasty snacks, there were still a few chickpeas here and there that didn't quite make the crunchy status they were supposed to but the success rate was probably around 80%. Perhaps another 5 minutes of cooking would have done the trick.

The man and son aren't very enthused about this type of snack which is one of the reasons I made them so long ago and didn't bother again. They are a dangerous thing for me to have around as I could down the whole batch in one sitting. I managed to show some restraint as I wanted to put the day 2 test on trial again. Similar to my first experience, after sealing them up in an airtight container they weren't as crunchy the next day.

I think the cooking time could be shortened by a using higher oven temperature, however I would advise to keep a watchful eye on them to avoid burning.           

Spiced roasted chickpeas

1 x 400g tin chickpeas, rinsed and drained
Olive oil spray
1/4 teaspoon ground coriander
1/4 teaspoon ground cumin
1/4 teaspoon smoked paprika
1/4 teaspoon onion powder
1/4 teaspoon garlic power
1/4 teaspoon salt


Preheat oven to 200C. Line a roasting tray lined with baking paper, place the chickpeas on top and bake in the oven for at least 45 minutes. While the chickpeas are cooking, mix the spices together in a small bowl. 

Towards the end of the baking time (about 35-40 minutes), take the tray out of the oven and shake the chickpeas around. To check whether the chickpeas are ready, carefully remove a couple of the larger chickpeas, allow them to cool a little then munch into them to test their crunchiness.

Remove the tray from the oven, spray the chickpeas with a little bit of olive oil spray then cover with the spice mixture. Shake the chickpeas around so they are well coated in the spice mixture. Wait for them to cool down and enjoy! 

Wednesday, July 6, 2011

No butter, no chicken


Several years ago, my office was located in the city which meant commuting on a daily basis and getting home late in the evenings. A meal (or two) was usually prepared during the weekend and other weeknight meals were quick and simple to prepare. Once a week the man used to lend a hand in the kitchen. More often than not, butter chicken was the meal he chose to make. 

A special recipe was given to him by an Indian colleague he used to work with. He was a lovely guy who was more than happy to share his knowledge of Indian food and seemed almost humbled that we were so interested in the cuisine of his country of origin. He warned that his butter chicken recipe is not comparable with the mild version that is served up in Indian restaurants to westerners, instead it's a spicier, more traditional recipe.

We used to feast on butter chicken on an almost weekly basis and although it was technically my night off cooking, I began trying out different Indian vegetable-based recipes as our side dish. This catalog of vegie curries served with a multitude of dal recipes helped me through our early days of vegetarianism. Butter chicken was initially sorely missed, although as time passed so did the urge to consume our old favourite.  

Mock meat is something I don't cook with often as there is such a wide variety of more nutritional foods out there, however, I do quite enjoy it now and then as an occasional treat. There had been a bag of soy nuggets hiding away in the freezer for a long time and I had plans to make a "butter chicken" the moment they were purchased. I decided that it would be a great time to put them to use on the man's birthday eve as he would be able to enjoy a delicious birthday lunch of leftovers at work. 


The only problem I encountered was that the recipe was nowhere to be found! Luckily I do have quite a good memory bank for recipes that have been made several times. After consulting with the man, we were fairly confident that we had the spices nailed. A couple of other tweaks here and there were required to replace the dairy products that were once a part of it.

The "butter chicken" turned out just as delicious as we all remembered, although no chickens or cows were harmed in the making. We enjoyed this curry with punjabi sprouts which was a replica of this punjabi cabbage recipe using brussel sprouts instead. Although the man loved his birthday Mexican dinner and cake, it was the "butter chicken" left-overs that really made his gastronomic day.  

"Butter Chicken" (Adapted from Shohil's recipe)

1 onion, chopped roughly
4 cloves garlic, chopped roughly
2 cm knob ginger, chopped roughly
1 tablespoon olive oil
2 cinnamon sticks
6 cloves
8 cardamon pods
2 heaped teaspoons ground coriander
2 heaped teaspoons ground cumin
2 heaped teaspoons garam masala
1 teaspoon turmeric
1 teaspoon salt
1/2 teaspoon chilli powder
1/4 teaspoon saffron powder
400ml tomato passata
1/2 cup ground almonds/almond mill
1 1/2 cups water
600g packet Lamyong soy nuggets (almost fully defrosted)
1/2 cup soy milk
2 tablespoons tofutti cream cheese
2 tablespoons dairy-free margarine

Place the onions, garlic and ginger into a blender with a couple of tablespoons of water and process until a smooth paste is achieved.

Heat the olive oil in a large pot and fry the cinnamon sticks, cardamon pods and cloves until fragrant. Add the onion, garlic & ginger paste and cook for about 5 minutes over medium heat. Stir through the coriander, cumin, garam masala, turmeric, salt, chilli and saffron powder and cook for another minute.

Add the tomato passata and then the ground almonds and mix until thoroughly combined. Pour in the water, bring to the boil then reduce the heat to simmer. Add the soy nuggets, cover the pot and cook for 5-10 minutes until the soy nuggets are cooked through.

Stir through the soy milk, tofutti cream cheese and dairy-free margarine. When the tofutti and margarine have dissolved into the gravy, turn off the heat and serve.