Welcome to MoFo Monday! Today I'm digging out a couple of bookmarked recipes from Vegan MoFo 2011 which was the first time I participated in this fun filled month of blogging. I limited myself to making two recipes due to time constraints and found it incredibly difficult to choose from the inspiring list of bookmarks I had gathered.
First up were Spicy Cajun Lentil Patties from Heathen Vegan. I don't have a regular veggie burger recipe that I rely on and enjoy trying out different concoctions from cookbooks, blogs and my head when the mood suits. Burgers aren't always served in buns at my abode either - I'm rather fond of a few protein packed patties alongside a plate of roasted vegetables in colder months. Jeni Treehugger's recipe appealed to me due to the inclusion of a Cajun spice mix as well as the combination of vegetables and other herbs and spices she had used. Her perfectly assembled patties also looked sensational.
Now, I'm going to be totally honest and let you know that I had two attempts with Jeni's recipe due to an ingredient mishap the first time around. The patties were supposed to be made with red lentils but I used brown lentils without thinking twice as they have been my default lentil recently. When the burgers didn't hold together cohesively and their appearance looked entirely different I read through the comments in the post and realised my mistake - oops. The patties tasted great so I had to give them another shot to do the recipe justice - and I'm glad that I did! Both times I doubled the quantity of Cajun spice to give them a little more kick and didn't regret this minor alteration. As I was already roasting vegetables in the oven, the burgers were whacked onto a separate tray and baked for 15 minutes on each side as I find this much easier than frying in batches on the stovetop.
Next cab off the rank was a Homemade Spicy Mustard from The Vegan Ronin. This really is a cinch to make - sterilise a jar, place mustard seeds, apple cider vinegar and water in the jar, shake it up and allow it to sit for a couple of days. After this time blend the mixture with a bit of sugar and turmeric and you're done! I only made half a batch as I didn't have enough mustard seeds for the full recipe but it was enough to fill a small jar. I kept the mustard on the chunkier side as I don't have a mini food processor and my full size blender doesn't do the best job with small quantities. The man is as a huge mustard fan and likened this to a hot English mustard in seeded form.
As it's so easy to make I'm sure I'll be making another batch when this jar runs out. I'm going to keep quiet about how we have enjoyed the mustard so far as it's going to feature in an upcoming MoFo post.
Showing posts with label Condiments. Show all posts
Monday, September 2, 2013
Saturday, November 17, 2012
Around the world - Stopover 22 - Singapore
The small island country of Singapore is located on the southern part of Malay peninsula, separated from Malaysia by a narrow strait of water. Malaysian food is commonly found in Singapore as well as Chinese, Indian, Indonesian, Middle Eastern and Western dishes. Noodle dishes are always popular at our house so I happily selected a few to make from an abundance of choices and due to my unsatisfactory attempt at making murtabak for Brunei I was also keen to give this another try.
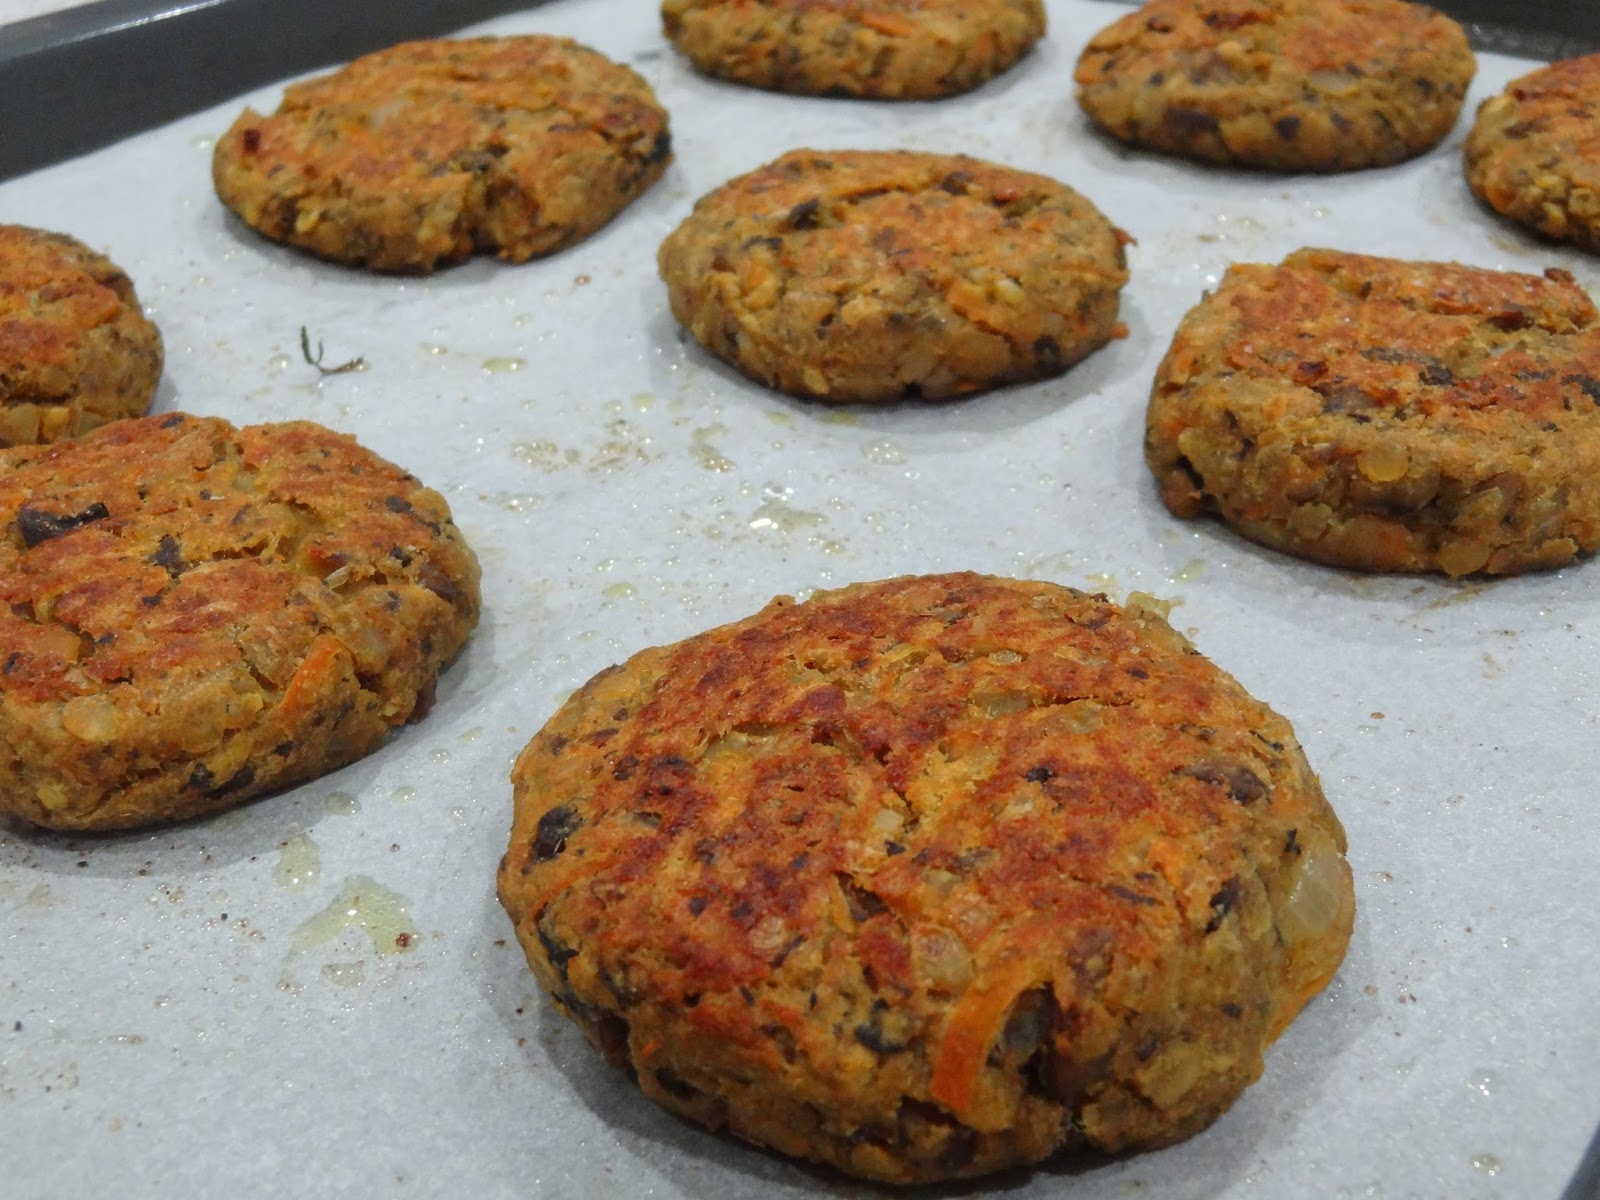
This version of murtabak was adapted from a Singaporean recipe with a promising blend of spices (no cardamon overload in this version!) and I used lentils and mushrooms instead of tempeh this time. Murtabak usually has egg in the filling so I seasoned some crumbled tofu with kala namak (black salt) prior to mixing it with the rest of the filling ingredients.
I also wanted to try making the roti and watched a few videos on YouTube of murtabak being made in market places. It was a bit daunting to see them being prepared with such ease as I knew it wouldn't be the case for a novice yet it also provided me with a few tips and the inspiration I needed. After making the dough, it was rested for an hour in a bowl coated with oil. The oil made the dough very supple and created an elastic texture that is required for it to be stretched out to a paper thin consistency. My technique was fairly rudimentary after the dough was initially flattened between my palms. I placed the dough on the bench holding one side down and slowly stretched the other side in a flapping motion, if that makes sense! The edges didn't turn out as thin as the centre so I pinched them with my fingertips and stretched them out last as best I could. Perhaps a rolling pin could have been better for this task!
The initial concerns I had about the thin dough not holding the filling went away after the first murtbak was successfully assembled and I gathered some momentum for the remaining ones. We loved the curry dipping sauce last time I made murtabak so I made another one based on a recipe from Munting Kusina. Thai thin soy sauce was substituted for fish sauce and even though I used a hot curry powder it didn't turn out too spicy. This turned out to be one of the favourite meals I have cooked recently. The murtabaks paired with the dipping sauce were so delicious and everyone was disappointed that there weren't any leftovers.
Mee Goreng is one of the man's favourite noodle dishes, he frequently orders it from Chinese/Malaysian restaurants but I haven't been able to replicate it at home as well as I would like. This latest attempt was much closer to how we are used to it although I was a little heavy-handed with the chilli and it still needs a few minor tweaks to the ingredients in the sauce.
Singapore noodles have become rather popular at home since In the Mood for Noodles posted a fantastic recipe last year. This time I tried a recipe from World Vegan Feast by Bryanna Clark Grogan. I found it interesting that it used jalapeno chillies and smoked tofu as well as seitan or soy curls. I omitted the seitan/soy curls and bumped up the quantity of the smoked tofu instead. Bryanna's version was very tasty and quite spicy although the recipe from In the Mood for Noodles remains the household favourite as it's the most similar to Singapore noodles we have eaten locally.
Murtabak with lentil and mushroom filling (Adapted from MakanTime)
Makes 6
Roti dough
2 cups plain flour
½ heaped teaspoon salt
2 teaspoons dairy-free margarine
2/3 cup lukewarm water
2-3 tablespoons peanut oil
Combine the flour and salt together in a large bowl, then rub the margarine into the mixture with your fingers. Add the water and mix together . Knead the dough for 10 minutes, then divide it into 6 even pieces and roll each piece into a ball. Place 2 to 3 tablespoons of peanut oil in a large bowl, roll the dough balls in the oil to coat them, then allow them to rest, covered with a tea towel for an hour.
Filling
½ cup brown lentils
150g firm tofu, crumbled
¼ teaspoon kala namak (black salt)
1 tablespoon peanut oil
2 small onions, diced
3 cloves garlic, minced
2cm piece ginger, minced
200g button mushrooms, diced
1 teaspoon garam masala
½ teaspoon cayenne pepper
1 teaspoon turmeric
1 teaspoon salt
½ cup water
Place the lentils in a saucepan and cover with water. Bring to the boil then reduce the heat and simmer for 30 minutes. Drain in a colander.
Crumble the tofu into a small bowl. Add the black salt and stir well to combine.
Heat the peanut oil in a deep sided frying pan or large saucepan over medium heat. Add the onions and fry for 5 minutes or until soft. Stir through the garlic and ginger for a minute then add the mushrooms and allow them to cook until softened. Add the garam masala, cayenne pepper, turmeric and salt and stir for a minute. Stir through the cooked lentils and the water and allow to cook on low heat for 5 minutes. Turn off the heat and mix the the tofu through. Allow the filling to cool down prior to assembling the murtabaks.
Assembly
Take a dough ball in your hands and flatten it between your palms. Place it on your bench and carefully stretch out the dough with your hands until it is a rectangular shape and your benchtop can be seen through the dough. Place 1/6 of the filling in the centre of the dough and smooth it into a small rectangle. Wrap the ends of the roti over the filling so it is enclosed like a parcel. Place the roti on a plate seam side down and repeat the steps five more times.
Pour a couple of tablespoons of peanut oil in a frying pan and place on medium-high heat. Fry the rotis in batches for a couple of minutes on each side or until browned. Top up with additional oil in between batches as necessary.
Serve with the following curry dipping sauce.
Curry dipping sauce (Adapted from Munting Kusina)
1 tablespoon peanut oil
1 clove garlic, minced
1 teaspoon hot madras curry powder
pinch cayenne pepper
½ teaspoon turmeric
1 ½ tablespoons Thai thin soy sauce
165ml tin (2/3 cup) light coconut milk
Heat the peanut oil in a small saucepan over medium heat and fry the garlic for 30 seconds, or until softened but not browned. Add the curry powder, cayenne pepper and turmeric and stir for 30 seconds. Pour in the Thai thin soy sauce and coconut milk and bring to the boil then turn off the heat and allow to cool. Transfer to a bowl for dipping.
______________________________________________________________________________________
Did you know?
Although Singapore is one of the smallest countries in the world, it's population density is the second highest.
Labels:
Around the World cooking,
Bread,
Condiments,
Lentils,
Mushrooms,
Noodles,
Tofu,
World Vegan Feast
Tuesday, September 11, 2012
Buffalo tofu with ranch dipping sauce
A couple of weeks ago, the man and I went back to Gasometer as we heard that the menu had changed again! I was delighted to find buffalo tofu strips back on the menu as I never had the chance to try them previously. We were both smitten with the spicy dense sticks of tofu and their accompanying dipping sauce so I wanted to try and replicate them at home. I had a secret ingredient up my sleeve to make life easier, a buffalo wing spice mix I had purchased from USA Foods ages ago which contained four simple ingredients - chile, red jalapeno, salt and garlic.
The buffalo wing mix came with a recipe for making wings which didn't really suit my purpose although it wasn't entirely useless either. I scaled down the marinade quantities to suit my block of tofu and when I couldn't make up my mind about frying or baking the tofu, I split the batch in half and put both methods to the test. There didn't turn out to be a lot of difference between these methods, I would say the baked tofu was slightly chewier and firmer than the fried version. I sought out a vegan ranch dipping sauce recipe to have with the tofu on VegWeb which was a breeze to mix together and the perfect cooling condiment to tone down the spices a little.
Recently we have made concerted efforts to seek out local farmers markets on weekends when time permits (stay tuned for another post on this soon). Last weekend I was pleased to bring home a bunch of organic baby purple carrots, baby leeks and kale amongst other things. The buffalo tofu was teamed up with some baked potato wedges with smoked paprika and salt, sauteed baby carrots with garlic and parsley and sauteed kale with baby leeks and a dash of lemon. Everyone agreed that the side dishes were just as delicious as the tofu. The buffalo tofu was really tasty and spicy yet not quite on the same level as Gasometer's fantastic version. As there is a large portion of the packet mix remaining this will definitely be on the menu again.
Buffalo Tofu (Adapted from Los Chileros buffalo wing mix)
350g firm tofu
1 tablespoon Los Chileros buffalo wing mix
1 ½ tablespoons vegan worchestershire sauce
1 ½ tablespoons olive oil
Press tofu for 30 minutes. Cut the block of tofu into thirds lengthwise then cut each piece into six equal sized sticks. Whisk together the buffalo tofu mix, worchestershire sauce and olive oil in a bowl. Add the tofu to the bowl and coat thoroughly with the marinade. Allow to rest for at least 30 minutes.
Bake the strips in the oven at 200C for 30 minutes, flipping after 15 minutes. Alternatively, fry in a pan with a little oil over medium heat until browned on both sides. Serve with ranch dressing.
Ranch dipping sauce (Adapted from VegWeb)
½ cup vegan mayonnaise (I used Praise 97% fat free)
1 teaspoon fresh parsley, finely chopped
½ teaspoon onion powder
¼ teaspoon garlic powder
¼ teaspoon salt
Freshly ground black pepper
Combine all ingredients together in a small bowl and refrigerate until required.
Tuesday, July 10, 2012
Tofu "fish" fingers with tartare sauce
Over the past year or so I have tried a few fish substitute recipes using tofu and none of them really hit the spot. I didn't bother posting about any of these unsatisfactory experiences and continued searching for a better recipe. Last week I tried one that was so good it was immediately requested to go onto high rotation.
I bookmarked a recipe for crispy tofu scallops from cookbook author Bryanna Clark Grogan's blog earlier this year and was interested to try it out as the tofu was marinated prior to being crumbed and fried. Other recipes I had attempted before this one had been battered in a seafood flavoured mixture. Rather than cut the tofu into the shape of scallops as Bryanna had done which would have resulted in leftover tofu scraps, I cut my tofu into strips to resemble fish fingers.
The recipe sounded fantastic so I didn't want to change too much and only substituted a few ingredients that weren't on hand at home. The absence of dulse or nori flakes in my pantry was of no concern as I was certain that shredding half a sheet of nori would suffice. It did do the job although I would probably use a full sheet next time around. I'm always a little cautious when mimicking seafood flavours as they have never really been my thing. Bryanna had used a type of cereal made of bran flakes which gave her scallops a crunchy coating, I was quite happy to use some wholemeal breadcrumbs this time around.
Bryanna's accompanying tartare sauce recipe wasn't going to work out with the ingredients I had available and after a quick search I found a recipe on allrecipes.com that almost suited my needs. I substituted a couple of gherkins and some fresh dill for the sweet pickle relish and asked the man to be my taste tester as he has much more expertise eating tartare sauce than I do.
The crispy outer layer of the "fish" fingers combined with the tender tofu within was incredible and the tartare sauce paired perfectly with them. I'm tempted to to give this a try with frozen and thawed tofu another time for comparative purposes although this is a recipe I don't think I'll be playing around with too much.
Tofu "fish" fingers (Adapted from Notes from the Vegan Feast Kitchen)
350g firm tofu, drained and pressed
1 cup water
3 tablespoons vegetarian stir fry sauce
1 tablespoon lemon juice
1 tablespoon olive oil
2 cloves garlic, minced
½ tablespoon raw sugar
1 teaspoon salt
½ - 1 sheet of nori, shredded in a spice grinder
½ cup plain flour
½ cup soy milk
1 teaspoon apple cider vinegar
2 crusts wholemeal bread, processed into breadcrumbs
Peanut oil or other vegetable oil, for shallow frying
Cut the tofu into thirds lengthwise, then cut each piece of tofu into 6 even sized sticks. Whisk together the water, vegetarian stir fry sauce, lemon juice, oilive oil, garlic, sugar, salt and nori in a deep sided dish and add the tofu ensuring that it is well coated in the marinade. Allow to rest covered in the refrigerator for several hours if possible, or at least 30 minutes.
Organise 3 bowls for coating the tofu fingers, plain flour in the first, soy milk mixed with apple cider vinegar in the second and breadcrumbs in the third.
Heat oil in a deep sided frying pan. Test the oil's readiniess by placing a breadcrumb into the oil, if it sizzles the oil is hot enough. Cook the tofu fingers in batches. Fry on one side for about 3 minutes and then flip over and cook on the other side for a further 3 minutes. Remove and place on paper towels to drain the excess oil.
Tartare sauce (Adapted from allrecipes.com)
½ cup vegan mayonnaise (I used Praise 97% fat free)
¼ small brown onion, very finely diced
2 gherkins, very finely diced
1 tablespoon dill, chopped finely
Mix all ingredients together in a small bowl at least 30 minutes before serving. Cover with plastic wrap and refrigerate until required.
Monday, May 28, 2012
Raita for curry night
When the man and I were gobbling down gobi pakoras a couple of weeks ago, we decided it was time for us to host another curry night with his family. It was a great excuse to eat some more pakoras and spread their deliciousness around. This time I decided to experiment with some other vegetables and used some broccoli and sweet potato as well as cauliflower.
Terry's coriander chutney was perfect with the pakoras last time so I had to make it again. I also wanted to try a second dipping sauce this time, something cooler and not as spicy for people with lower heat preferences. After searching for vegan raita recipes, I settled on using a tofu based one from Vegetarian Times. It was very simple to put together and after an initial taste test I was concerned that there was still a slight taste of soy present so I added a bit of garlic just in case. I have found in the past that blended tofu sauces and dips develop more flavour after sitting in the fridge for a short period. The garlic may not have been entirely necessary in this recipe although no-one seemed to mind it either.
I made a small portion without cucumber as one of the dipping sauces for the pakoras and added cucumber to the remainder which was used as a cooling condiment on the dinner table to have with our curries. The pakoras were a huge success, particularly the broccoli and cauliflower ones even though the batter didn't work out quite as well as it had previously. Perhaps it wasn't a wise idea to mix it up too far in advance prior to using it.
Stay tuned for another post about our curry night soon!
Tofu raita with mint and cucumber (Adapted from Vegetarian Times)
224g silken tofu
3 tablespoons olive oil
2 tablespoons lemon juice
2 teaspoons brown rice vinegar
3/4 teaspoon salt
1 clove garlic, minced (optional)
1 thai green chilli, seeded and minced
1/2 lebanese cucumber, diced
1 tablespoon fresh mint, finely chopped
1/2 teaspoon cumin
Place the tofu, olive oil, lemon juice, brown rice vinegar and salt in a blender and process until smooth. Transfer the contents to a bowl and stir through the garlic, chilli, cucumber, mint and cumin. Cover and refrigerate for at least 30 minutes before serving.
Wednesday, February 1, 2012
Tomato and chilli relish
When it comes to making preserves, I am a complete and utter novice. You could say that I was a virgin in this department until a few days ago. Over the years, I have had the best intentions to utilise some of my various home-grown produce into jams, relishes or chutneys although I never managed to get around to it.
My mother and mother in-law are old hands at making preserves and always pass on a jar or two of their various wares. I discussed tomato based recipes with my mother in-law last weekend who showed me a great pile of old recipes she had been collecting over the years. She offered to lend me her book full of clippings and at the end of the evening, I forgot to take them home with me.
I took this as an opportunity to look through my own cookbooks and stumbled across a Tomato and chilli relish in an old Charmaine Solomon cookbook published by Family Circle in 1991. It sounded like a perfect recipe for me to try, especially as I had several home-grown chillis ready to use as well as a bounty of tomatoes. My chillies are quite small but they have a decent amount of heat, I have learnt that a little bit goes a long way.
I haven't taken any photos of my tomato plant this year as I am rather ashamed of it's appearance. It was neglected for a period and the leaves started to brown, ironically it has produced the most perfect fruit of any tomato plant I have grown. The bowl in the picture is holding 1.7 kg of beautiful ripe fruit, I only used 1 kg of these in the relish as we have been enjoying the tomatoes so much in salads, sandwiches and various other ways.
Charmaine's recipe called for 3 kg of tomatoes so I made a third of the quantity and also altered a couple of other things along the way. The tomatoes were supposed to be peeled first which I didn't bother with, I forgot to measure the salt so might have used a bit less and I also doubled the amount of curry powder as I felt it needed more after a taste test.
As this was my first relish attempt, I was astonished with the amount of sugar that went into it. After I added the final ingredients and had a taste, I was certain that it was going to be way too sweet. When the relish was bottled and cooled down, I nervously gave the man a spoonful to sample and was relieved when he declared it to be a good one. He loves a good relish so I was interested to hear his opinion. I was pleasantly surprised upon tasting the relish as the sweetness had mellowed throughout the cooking and cooling process.
The recipe filled three small jars and one slightly larger jar (total of approx. 950ml) and could easily be doubled or tripled to suit your needs. The amount of chilli and curry powder could also be increased or decreased to suit your personal taste.
Tomato and chilli relish (Adapted from a Charmaine Solomon recipe)
1 kg ripe tomatoes
2 medium brown onions
2-3 teaspoons salt (should be 3 teaspoons based on the recipe)
2 bird's eye chillies
300ml brown vinegar
250g raw sugar
1/4 cup plain flour
2 teaspoons curry powder
1 teaspoon mustard powder
1 teaspoon turmeric
Chop the tomatoes and onions and place them in a large non-metallic bowl sprinkled with the salt. Allow it to sit for at least 8 hours or overnight.
Drain the tomatoes and onions in a colander, then place them into a large saucepan with the chillies. Combine the sugar, plain flour, curry powder, mustard powder and turmeric in a bowl and add enough vinegar to make a thick paste and set aside. Pour the remaining vinegar into the saucepan and simmer on medium-low for 45 minutes.
Stir the paste into the saucepan, bring to the boil and stir until it becomes thick. Reduce the heat to low and simmer for 1 hour, stirring occasionally.
Spoon the relish into warm sterilised jars and seal tightly.
Subscribe to:
Posts (Atom)